


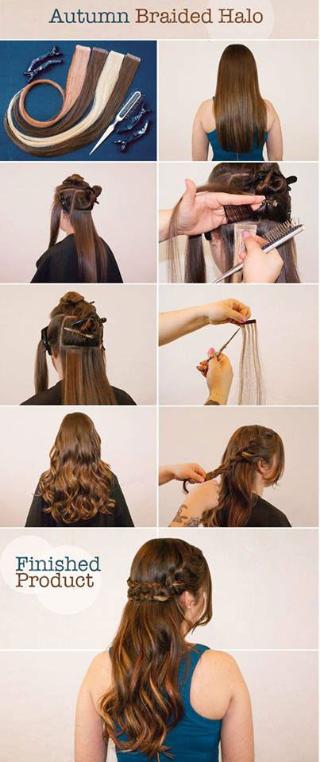
 On this step-by-step, learn how to create a braided halo that includes pops of color using tape-in Hotheads Hair Extensions!
Step 1: Begin with straight hair to assist with sectioning.
Step 2: Using a tailcomb, section the hair in four sections as shown. Clip away both front sections.
Step 3: Section 3/4″ clear of the hairline equal density and width because the extension piece to make sure the tape tab will secure the hair. Flip up the section, and place the contrasting color underneath the section (for a distinct POP of color!). Place the darker color on top with the adhesive side facing down, sandwiching the hair between both tabs.
Step 4: Firmly press the tabs together to stick and create a water-tight seal. Continue this technique across the head until you reach the row above the ear.
Step 5: To attain a dramatic effect, notch out most of the darker color to let the contrasting color peek through.
Step 6: After the extensions are applied, use a 1.5″ curling wand to create a flowy texture.
Step 7: Begin the braid toward the back of the top. Ensure the braid falls at the top row of the extensions (to conceal those “hair secrets!”), while pulling forward the pops of color to reveal.
Final: Repeat the braid at the opposite side. Tie the ends, then pin behind the other braid. Then, there’s nothing left to do except STRUT!
VIDEO: Find out how to remove Hotheads Hair Extensions